Lecture 25 (Module 4). Risk Management Framework
Risk Management Framework and final checklist

Thandiwe Mbeki
Published · Updated

How This Course Fits Together
Twenty-four lectures have each covered a distinct piece - an order type, a cost, a strategy, a risk. This final lecture doesn’t introduce new material; it’s about seeing how those pieces stack into a single, coherent framework.
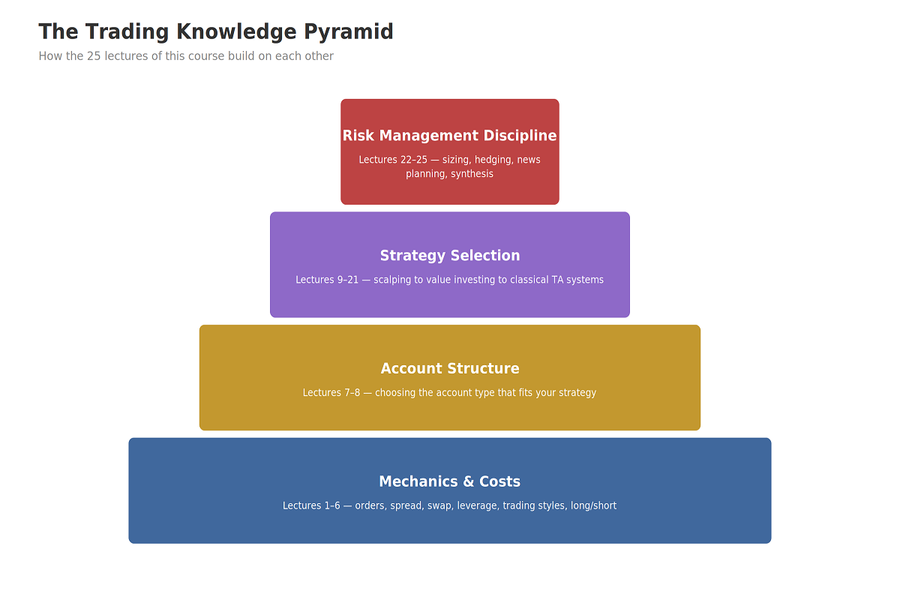
Figure 1 shows the order deliberately: each layer depends on the one beneath it holding up.
- Mechanics & Costs (Lectures 1–6) is the foundation everything else rests on, without understanding order types, spread, swap, leverage, and the basic trading styles, no strategy decision above it is really informed.
- Account Structure (Lectures 7–8) translates that foundation into a concrete choice, which account type actually fits the trading style you intend to run.
- Strategy Selection (Lectures 9–21) is where most of this course’s content lived but every one of those strategies, from scalping to value investing to the classical TA systems, only works within the cost structure and account setup beneath it.
- Risk Management Discipline (Lectures 22–25), at the top, is the narrowest layer but the one that determines whether everything below it survives contact with real, sustained trading - position sizing, hedging, and news awareness aren’t optional extras, they’re what keeps a sound strategy from being undone by an oversized bet or an unplanned surprise.
The One Idea Worth Carrying Forward
If this course has a single throughline, it’s this: almost every serious loss covered in these 25 lectures came from skipping a step in this pyramid, not from picking the “wrong” strategy. Martingale (Lecture 10) failed on position sizing, not on market analysis. A pairs trade goes wrong on correlation breakdown (Lecture 17), not on the entry signal. A scalper loses to costs (Lecture 9), not to bad timing. The strategy layer gets most of the attention but the layers underneath it are usually where the real damage, or the real protection, actually happens.
Your Personal Risk Management Checklist
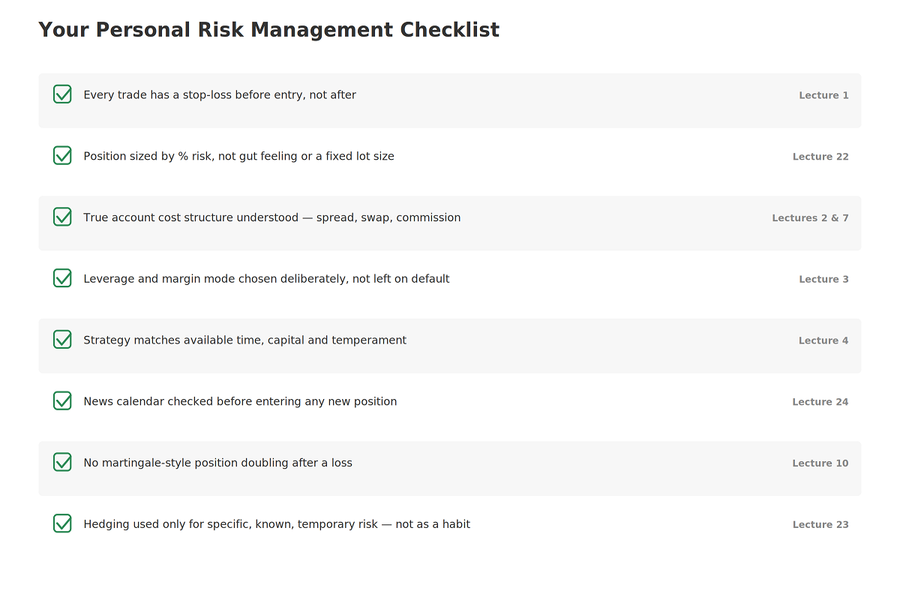
Figure 2 distills the course into eight checks worth running on every position, before it’s opened rather than after. None of these require a specific strategy. They apply equally whether the position came from value investing, a pairs trade, or Bill Williams’ Alligator. This is deliberately not a strategy checklist; it’s the discipline layer that sits above and independent of whatever strategy generated the trade idea in the first place.
Building Your Own Framework From Here
This course has covered a wide range of strategies deliberately - not because a trader should run all of them, but because the right strategy depends entirely on individual circumstances: available time (Lecture 4), risk tolerance, capital, and temperament. The next step isn’t to adopt everything covered here. It’s to honestly assess those personal constraints, choose one or two strategies that genuinely fit them, and apply the full weight of Module 4’s discipline to those choices consistently, rather than switching approaches every time one has a rough stretch.
Closing Thought
Every lecture in this course, in one way or another, has been about the same underlying tension: markets offer opportunity, and every tool for capturing that opportunity comes with a cost or a risk attached. Leverage amplifies gains and losses alike. A tighter spread account often means a higher minimum deposit. A strategy with more trade opportunities usually means more exposure to transaction costs. There is no tool covered in these 25 lectures that removes this trade-off, only ways to understand it clearly enough to manage it deliberately, rather than discovering it by accident.